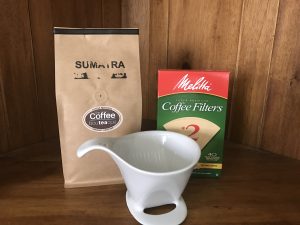
I am often asked, “how do I do a good pour-over coffee”? Let me first say that I absolutely love this simple method of brewing coffee. The aroma while brewing is captivating and the visual effect is engaging. I have had countless memorable conversations with people while creating a pour-over at the shop. It really does invite fun conversation filled with engaging facts about coffee, while also connecting on a personal level. Let’s break down this simple brewing method step by step.
The dripper and filter
We like to use a ceramic dripper from “beehouse“. We use ceramic because the heat retention is superior to other materials used for drippers, which I think is a critical aspect when looking for the perfect end result. It’s also easy to clean and durable.
Next, I use a natural kraft paper filter. I choose natural brown filters so as to avoid bleaches and chemicals found in white filters which certainly affect the taste.
The grind
A great pour-over requires the correct grind size. I have found the perfect grind size to be 2 steps finer than a standard drip grind. However, feel free to play with this step to determine which grind size creates the perfect end cup for your palate. In the end, coffee is a palate thing, so I do not think there is any right or wrong here as long as you end up with a smile on your face, that’s cool with me.
How much coffee should I use?
For me this is a hard, never changing number. It took plenty of experimentation done both personally and at the retail level to figure out our sweet spot and for me its 26 grams of coffee to yield a 16 oz. cup. You can scale this ratio to fit the size of the cup you are looking for in your pour-over but for me its always a 16 oz. cup. Some baristas like to get into micro nuances here but quite simply a 16 oz cup is only holding 16 oz. so I see no need to pre-measure water. But hey, if that’s your thing, go for it. Enjoy your pour-over process your way. Just make sure your pour-over is made with filtered water. Coffee is about 98% water so if you begin with poor water quality, its tough to end up with a good cup.
Coffee
This is an absolute and I would rather not have a pour-over if the coffee is not a fresh roast. To me, this is coffee that is within 3 weeks of roast, but preferably within 1 week. We will talk about the “bloom” created in a good pour-over next, but coffee will not bloom if the coffee is not really fresh.
Pre-soak your filter. Next, add your ground coffee to the filter and jostle the dripper until the grounds are level. Then take your finger and poke a small dent in the center of the grounds causing a dimple. This is your water target. Using a gooseneck kettle with water temperature around 200-205, start slowly pouring in the center until the grounds are all saturated. Then back off for about 15 seconds. Take this time to take in the aroma and watch the “bloom” happen. Continue to add water slowly. Never let the water level rise above the 3/4 mark of the dripper or below the 1/2 mark. So the idea here is to keep a slow and steady pour until your cup is full. If done correctly, and using the proper grind size this process should take between 2 1/2 and 3 minutes from start to finish.
So there you have it. Step by step guide to a great pour-over. Simple, inexpensive and always fresh. Cheers!


